
In this video I’m going to show you how we create more horizontal engagement and address root depth when it comes to the John Deere 620 and the John Deere 630 starter when installing our John Deere starter.
Changing Drive Gear on Denso Starter: • Changing Drive Gear on Denso Starter
Purchase John Deere 620 / 630 Starter: https://heielectric.com/shop/starters/john-deere-630-starter/
Full Transcript (English)
0:02 – Hello Larry at Hagemeisters, today we want to talk about our John Deere 630 starter, this was sent back to us from a customer that’s used it for some time, it has some definite wear marks on the end of the gear and we’re going to show you what we want to do to address that problem and to help him out with his starter
0:23 – [Music]
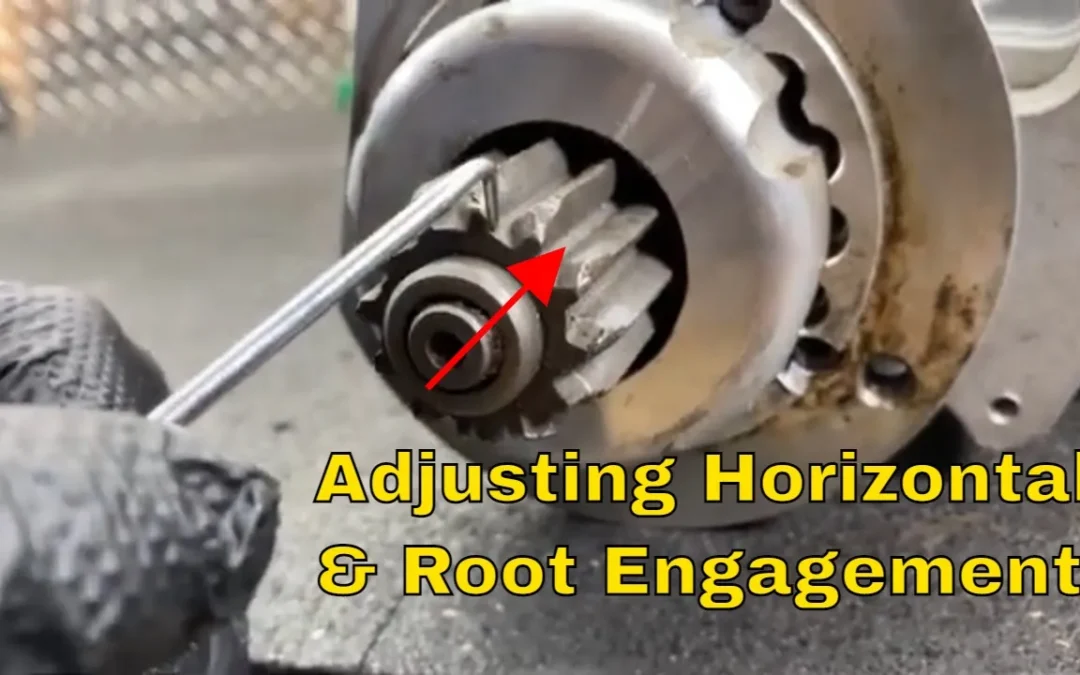
0:34 – So what we have here is the marks on the gear of it going into the flywheel, and you know it’s all fine, you can see some some wear ,we could use a little bit more engagement right here, and that would be our horizontal depth
0:51 – This in the bottom is called the root of the gear, you can see by these marks that right there it could have a little bit more root depth, and we can show you how we’re going to do that with this starter
1:14 – So the original John Deere Delco starters have a pilot offset, this is called our pilot or register, has two names I guess, I like to use the word pilot because this is what dials into the tractor to keep the starter where it needs to be for the proper distance from the ring gear flywheel
1:33 – So, as you can see in the photo, the pilot depth is different on the original Delco than it is on any other starter that is in this series of tractor, and i don’t know why that is, but it comes with a with a different tooth count gear than we use, which is not always critical because the tooth count isn’t critical, that the measurement is good is correct so these teeth are meshing just fine
2:04 – But he might have somewhere in his flywheel some things like that, now I’m going to recommend that we do a little trick that we do on these starters to help the pilot offset, because we don’t have a pilot offset like the Delco does, so what we do is we use these studs, which is just simply made out of a carriage bolt
2:27 – Let me put these in here and when you slide the starter up in there you use these studs instead of the original bolts, which have a head on them
2:42 – So now what you do is put these washers on like that, and then install the starter, and put the nut on on the outside
2:56 – So what that does is it tips the starter like that, so this root depth will increase and this customer has some room for some more root depth
3:10 – So those washers work perfectly for that, it doesn’t hurt anything because we have a thick pilot, this is a thick pilot here, and we have enough room to make some adjustments to get that to go in the tractor
3:23 – And again sometimes these older tractors you know, he could have some crankshaft float, some other things, but what we’re going to do next is remove this plate, and we’re going to cut each side of it down a little bit to get him a little bit more horizontal depth, that’s what we’re after now
3:50 – We just take off a little bit at a time and then we’ll check our measurements
4:20 – Let’s take a look at that and see how that looks
4:27 – So far we’ve taken a couple passes, and cut some material off, this is what we got to deal with right here, we just can’t remove so much that we don’t have enough to hold the starter, good, and again a lot of times people are confused about the horizontal depth of the gear
4:49 – We never want it to go completely all the way through the flywheel ring gear because then you take a chance of it sticking
4:58 – Most starter drives, almost all starter drives engage about three quarters of the horizontal depth of the flywheel ring gear, and we can improve on that, and that’s what we’re trying to do here
5:19 – Okay, we just got it out of the lathe, we took off some material, we’ve still got this much of the shoulder that the bolts going to rest against up there, so we have plenty of shoulder for all those four bolts to hold, so we didn’t hurt that at all, and let’s take a look at what we’re going to gain
5:49 – Come out to 11.54 so when we do the math we’re gonna gain him just a little bit over three millimeter
6:01 – Okay, we’ve got our face plate back on, got the bolts nice and tight, we’re going to go ahead and change this gear now, because that’s the last step, we’ve used it to do all of our measuring on and it was great to have these witness marks on here, and so we can make those measurements so we’ll move this out and go ahead and change that gear
6:24 – [Music]
6:55 – So we’ve got the new drive installed, the snap ring’s in place, and the collar is around the snap ring to keep it on, and then you got to make sure you got your compression proper so when it goes into the ring gear flywheel you’ve got some cushion when it hits
7:34 – Here’s our old gear and again this is how much we’ve gained for the horizontal, and then with the washers on there is going to tip the starter for some more root depth and we’re ready to send this back to the customer, and should be in good working order
7:53 – So finish up on this project here I wanted to explain a couple things about these clutches as well, so all starter drives have an overriding clutch in that it slips one way and locks up the other, and sometimes customers struggle with the terminology, because they don’t quite understand it
8:12 – Oh it’s not kicking in well you know kicking in and not locking up is two different things, a lot of times the clutch is bad in starters, they go in the engine, the flywheel ring gear, but they freewheel and so it’s actually in but the clutch is no good, this one here has a really nice clutch, it’s got some nice resistance there and then it locks up the other direction, and then you know comments are made about chewing up my flywheel and it’s not going in deep enough, well there’s two different things as I’ve explained in this video about going in your root depth and your horizontal depth, so this starter is a good example of that, because we addressed both of those today
8:57 – Also want to mention to the direction of starters, and this starter starters always turn the way the clutch slips, so this starter is a clockwise rotation starter
9:09 – So if you ever wonder which way the starter turns, just slip the clutch and that’ll tell you which way it turns
0:23 – [Music]
0:34 – So what we have here is the marks on the gear of it going into the flywheel, and you know it’s all fine, you can see some some wear ,we could use a little bit more engagement right here, and that would be our horizontal depth
0:51 – This in the bottom is called the root of the gear, you can see by these marks that right there it could have a little bit more root depth, and we can show you how we’re going to do that with this starter
1:14 – So the original John Deere Delco starters have a pilot offset, this is called our pilot or register, has two names I guess, I like to use the word pilot because this is what dials into the tractor to keep the starter where it needs to be for the proper distance from the ring gear flywheel
1:33 – So, as you can see in the photo, the pilot depth is different on the original Delco than it is on any other starter that is in this series of tractor, and i don’t know why that is, but it comes with a with a different tooth count gear than we use, which is not always critical because the tooth count isn’t critical, that the measurement is good is correct so these teeth are meshing just fine
2:04 – But he might have somewhere in his flywheel some things like that, now I’m going to recommend that we do a little trick that we do on these starters to help the pilot offset, because we don’t have a pilot offset like the Delco does, so what we do is we use these studs, which is just simply made out of a carriage bolt
2:27 – Let me put these in here and when you slide the starter up in there you use these studs instead of the original bolts, which have a head on them
2:42 – So now what you do is put these washers on like that, and then install the starter, and put the nut on on the outside
2:56 – So what that does is it tips the starter like that, so this root depth will increase and this customer has some room for some more root depth
3:10 – So those washers work perfectly for that, it doesn’t hurt anything because we have a thick pilot, this is a thick pilot here, and we have enough room to make some adjustments to get that to go in the tractor
3:23 – And again sometimes these older tractors you know, he could have some crankshaft float, some other things, but what we’re going to do next is remove this plate, and we’re going to cut each side of it down a little bit to get him a little bit more horizontal depth, that’s what we’re after now
3:50 – We just take off a little bit at a time and then we’ll check our measurements
4:20 – Let’s take a look at that and see how that looks
4:27 – So far we’ve taken a couple passes, and cut some material off, this is what we got to deal with right here, we just can’t remove so much that we don’t have enough to hold the starter, good, and again a lot of times people are confused about the horizontal depth of the gear
4:49 – We never want it to go completely all the way through the flywheel ring gear because then you take a chance of it sticking
4:58 – Most starter drives, almost all starter drives engage about three quarters of the horizontal depth of the flywheel ring gear, and we can improve on that, and that’s what we’re trying to do here
5:19 – Okay, we just got it out of the lathe, we took off some material, we’ve still got this much of the shoulder that the bolts going to rest against up there, so we have plenty of shoulder for all those four bolts to hold, so we didn’t hurt that at all, and let’s take a look at what we’re going to gain
5:49 – Come out to 11.54 so when we do the math we’re gonna gain him just a little bit over three millimeter
6:01 – Okay, we’ve got our face plate back on, got the bolts nice and tight, we’re going to go ahead and change this gear now, because that’s the last step, we’ve used it to do all of our measuring on and it was great to have these witness marks on here, and so we can make those measurements so we’ll move this out and go ahead and change that gear
6:24 – [Music]
6:55 – So we’ve got the new drive installed, the snap ring’s in place, and the collar is around the snap ring to keep it on, and then you got to make sure you got your compression proper so when it goes into the ring gear flywheel you’ve got some cushion when it hits
7:34 – Here’s our old gear and again this is how much we’ve gained for the horizontal, and then with the washers on there is going to tip the starter for some more root depth and we’re ready to send this back to the customer, and should be in good working order
7:53 – So finish up on this project here I wanted to explain a couple things about these clutches as well, so all starter drives have an overriding clutch in that it slips one way and locks up the other, and sometimes customers struggle with the terminology, because they don’t quite understand it
8:12 – Oh it’s not kicking in well you know kicking in and not locking up is two different things, a lot of times the clutch is bad in starters, they go in the engine, the flywheel ring gear, but they freewheel and so it’s actually in but the clutch is no good, this one here has a really nice clutch, it’s got some nice resistance there and then it locks up the other direction, and then you know comments are made about chewing up my flywheel and it’s not going in deep enough, well there’s two different things as I’ve explained in this video about going in your root depth and your horizontal depth, so this starter is a good example of that, because we addressed both of those today
8:57 – Also want to mention to the direction of starters, and this starter starters always turn the way the clutch slips, so this starter is a clockwise rotation starter
9:09 – So if you ever wonder which way the starter turns, just slip the clutch and that’ll tell you which way it turns
For any questions regarding your equipment needs, please call Larry at the shop.
HEI Phone number is 1-800-944-0494, ask for Larry.
Or send us an email through our contact form.
HEI Phone number is 1-800-944-0494, ask for Larry.
Or send us an email through our contact form.